How to build a handmade gun cabinet for a luxurious display

How to build a handmade gun cabinet for a luxurious display

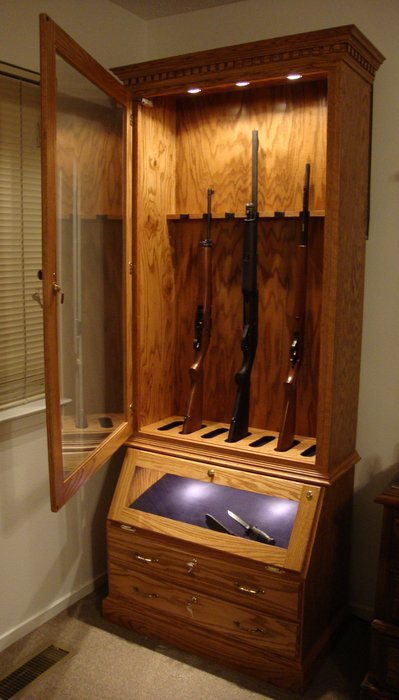
Building a Luxurious Handmade Gun Cabinet for Display

A gun cabinet is more than just a storage solution; it's an opportunity to showcase your firearms in a manner that reflects your passion and taste. A handmade gun cabinet, crafted with meticulous attention to detail, elevates the display to a level of elegance and sophistication, transforming your collection into a focal point of your home.

This comprehensive guide will lead you through the process of building a luxurious handmade gun cabinet, covering everything from planning and materials to construction and finishing. With careful planning and dedication, you can create a masterpiece that not only safeguards your valuable firearms but also enhances your home décor.

Planning Your Gun Cabinet

1. Determine Size and Dimensions

The first step is to assess your collection and determine the size and dimensions of your gun cabinet. Consider the number and types of firearms you wish to display, the available space in your home, and the overall aesthetic you envision.

2. Choose a Style

The style of your gun cabinet will set the tone for the entire display. Consider traditional, modern, rustic, or contemporary styles. Research examples of gun cabinets that resonate with you and gather inspiration from various sources.

3. Select Materials

The choice of materials will significantly impact the look and feel of your gun cabinet. Popular options include:

  • Hardwoods: Walnut, cherry, mahogany, oak, and maple offer strength, durability, and beautiful grain patterns.
  • Softwoods: Pine and cedar provide a lighter, more rustic aesthetic.
  • Metal: Steel or aluminum can create a modern, industrial look.
  • Glass: Tempered glass can be used for display shelves and doors, offering a sleek, contemporary touch.

4. Design the Interior

The interior of your gun cabinet should be designed to accommodate your collection safely and securely. Consider features such as:

  • Adjustable shelves: Provide flexibility to display firearms of different sizes.
  • Locking drawers: For storing accessories, ammunition, or valuable items.
  • Gun racks: Ensure secure and organized storage for firearms.
  • Humidifier: Maintain optimal humidity levels to protect your firearms.

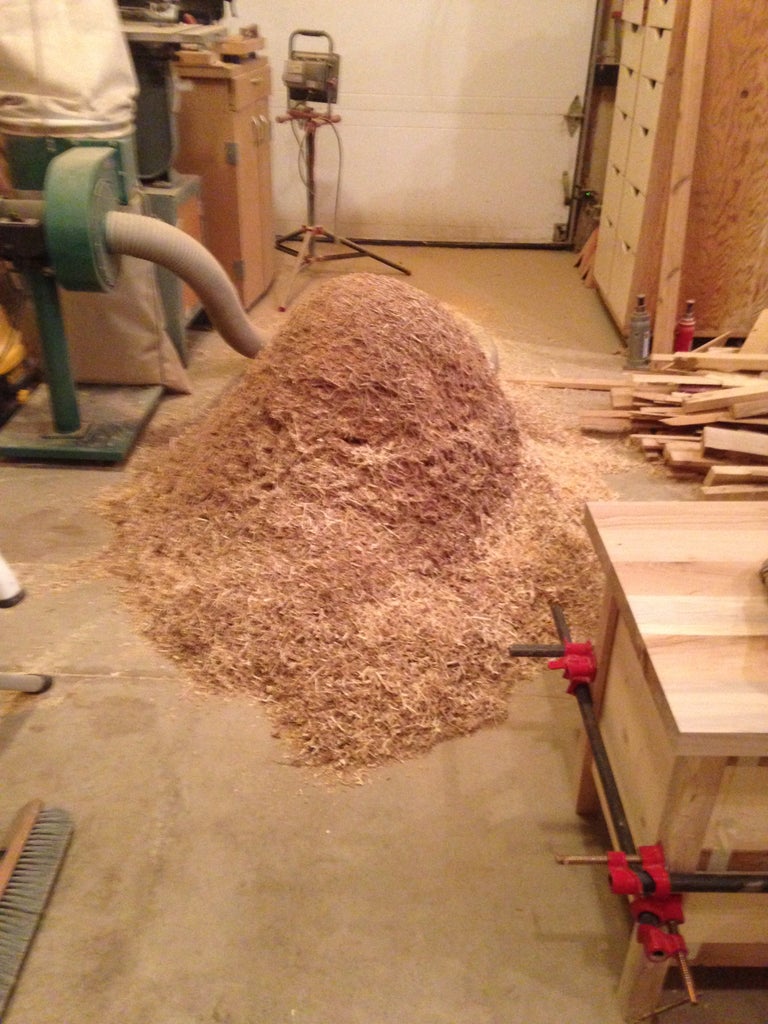
Construction and Assembly

1. Build the Cabinet Base

Begin by constructing a sturdy base to support the weight of the cabinet. Use mortise-and-tenon joints for strong and durable connections. Carefully measure and cut the base pieces, ensuring they are square and level.

2. Assemble the Sides and Back

Cut the sides and back panels to size and assemble them to the base. Use glue and screws for a secure bond. Create dado joints to accommodate the shelves and drawers.

3. Install Shelves and Drawers

Install the shelves and drawers using dovetail joints for a strong and elegant connection. Use high-quality drawer slides for smooth operation.

4. Assemble the Doors

Craft the doors using mortise-and-tenon joints or similar construction techniques. Use high-quality hinges and a sturdy locking mechanism for security.

Finishing Touches

1. Sanding and Staining

Thoroughly sand the cabinet to achieve a smooth, even surface. Apply a stain to enhance the natural beauty of the wood. Choose a stain color that complements your home décor and the style of your gun cabinet.

2. Applying a Protective Finish

Seal the wood with a protective finish, such as polyurethane or lacquer, to enhance durability and prevent scratches and moisture damage. Multiple coats will provide a superior finish.

3. Adding Details

Enhance the luxurious appeal of your gun cabinet with custom details. Consider adding:

  • Intricate carvings: Create elegant accents that reflect your personal taste.
  • Brass hardware: Adds a touch of sophistication to the cabinet's appearance.
  • Custom-made nameplate: Personalize the cabinet with your name or initials.

Tips for Displaying Your Firearms

Once your gun cabinet is complete, it's time to showcase your collection with style and safety.

1. Create a Focal Point

Arrange your firearms in a way that highlights their unique features and creates a visually pleasing display.

2. Use Lighting to Your Advantage

Install adequate lighting to illuminate your firearms and enhance their appearance.

3. Incorporate Decorative Elements

Enhance your display with decorative elements, such as antique firearms, swords, or historical memorabilia, to create a thematic collection.

Safety and Security

Always prioritize safety and security when displaying firearms.

1. Secure the Cabinet

Use heavy-duty locks and secure the cabinet to the wall or floor to prevent theft.

2. Store Firearms Safely

Store firearms in a secure manner, using gun racks or other storage methods that prevent accidental discharge.

3. Follow Local Regulations

Ensure that your display complies with all local laws and regulations regarding firearms storage and display.

Conclusion

Building a handmade gun cabinet is a rewarding endeavor that allows you to create a luxurious display for your valuable firearms. With careful planning, skilled craftsmanship, and an eye for detail, you can craft a masterpiece that reflects your passion and elevates the aesthetic of your home. Remember to prioritize safety and security throughout the process, and enjoy the satisfaction of showcasing your collection in a unique and elegant manner.

Share:

How to design and build an in-wall gun cabinet for concealed storage

How to design and build an in-wall gun cabinet for concealed storage

Building an In-Wall Gun Cabinet: A Guide to Concealed Storage

Hey there, gun enthusiasts! You know the drill: safety first. But what about security? Sometimes, a traditional gun safe just doesn't cut it. Maybe you're renting and can't install a heavy safe, or you want something more discreet. That's where a hidden in-wall gun cabinet comes in handy. It's a clever way to keep your firearms secure while blending seamlessly into your home decor.

Planning Your In-Wall Gun Cabinet

Building an in-wall gun cabinet is a serious undertaking, so don't jump in without careful planning. Let's break down the process:

Location, Location, Location

Think strategically. You want a spot that's easily accessible to you, but not obvious to visitors. Consider these factors:

  • Wall thickness: You need a wall thick enough to accommodate the cabinet, plus any framing and insulation.
  • Accessibility: Make sure you can comfortably reach the cabinet and open it. You don't want to be contorting yourself in awkward positions.
  • Concealment: Choose a spot that won't draw attention. Behind a bookshelf, a picture frame, or even within a closet are good options.
  • Choosing Materials

    Quality matters! You're dealing with firearms, so safety and durability are key. Here's what you'll need:

  • Wood: Solid hardwood, like oak or maple, is ideal. It's strong, resistant to warping, and can be stained to match your decor.
  • Metal: Consider using steel or aluminum for extra security. These materials can be incorporated for the cabinet's frame, hinges, and lock mechanism.
  • Fasteners: Use heavy-duty screws and bolts designed for structural applications. Don't skimp here!
  • Door hinges: Invest in concealed hinges, as these offer better security. Choose a sturdy, reliable model.
  • Lock mechanism: Consider a high-quality lock with a keyhole that's hidden or covered. You can also explore electronic locks for added security and convenience.
  • Drawing Up Plans

    Now, it's time to get technical. Before you start cutting wood, sketch out detailed plans:

  • Measure twice, cut once: Take precise measurements of the space you've chosen. Factor in the thickness of the wall and any framing.
  • Determine dimensions: Sketch out the cabinet's dimensions, including depth, width, and height. Remember, it should be large enough to hold your firearms comfortably and securely.
  • Decide on shelf configuration: Plan where you'll place shelves to hold your firearms and any accessories. Consider using adjustable shelves for greater versatility.
  • Mark out the door opening: Carefully mark where you'll cut the door opening. This should be done on the wall itself, using a level and a pencil.
  • Building the Cabinet

    Ready to get your hands dirty? Here's a step-by-step breakdown:

    Framing the Cabinet

    Start by constructing the cabinet's frame using the wood you've chosen. Here's a general outline:

  • Cut the pieces: Using your plans, cut the wood to size for the cabinet's sides, top, bottom, and back.
  • Assemble the frame: Join the pieces together using wood glue and screws, ensuring tight and secure connections. If using metal, you'll likely be using screws, rivets, or welding for joining.
  • Add support: Include extra support in areas that will be under heavy stress, such as where the door hinge will be attached.
  • Installing the Door

    The door is what makes your cabinet hidden, so pay close attention to this step:

  • Cut the door opening: Once the frame is complete, carefully cut the door opening in the wall using a jigsaw. Be sure to use safety glasses and a dust mask.
  • Attach hinges: Install the concealed hinges to the door and the cabinet frame. Make sure they're aligned perfectly for smooth operation.
  • Add the door: Carefully hang the door on the hinges. Ensure it closes securely and flush against the wall. You may need to adjust the hinges slightly.
  • Adding Shelves

    Shelves keep your firearms organized and secure:

  • Measure and cut shelves: Cut shelves to the desired length and width, based on your plans. If using adjustable shelves, make sure you have the necessary brackets or rails in place.
  • Secure the shelves: Attach the shelves to the cabinet walls using sturdy brackets or screws. Make sure they're installed at a height that's safe and convenient for accessing your firearms.
  • Finishing Touches

    Now, it's time to make your cabinet look good and function smoothly:

  • Paint or stain: Paint or stain the cabinet to match your existing decor. You can use a high-quality finish to protect the wood and make it durable.
  • Install the lock: Install the chosen lock mechanism, ensuring that the keyhole is well-hidden or protected.
  • Add a handle or latch: If you want to make the cabinet more discreet, you can add a hidden handle or latch mechanism. You can even use a magnetic latch for seamless operation.
  • Clean and dry: Once everything is in place, give the cabinet a thorough cleaning and let it dry completely before storing your firearms.
  • Safety Precautions

    Building a gun cabinet requires safety first. Here's what you need to keep in mind:

  • Use proper tools and equipment: Use the right tools for the job, ensuring they're in good working order. Always wear safety glasses, a dust mask, and gloves when working with power tools.
  • Follow instructions carefully: Read and understand the instructions for all tools and materials you're using. Take your time and don't rush the process.
  • Double-check measurements: Precise measurements are crucial. Double-check everything before cutting or drilling. A mistake at this stage can have serious consequences.
  • Use caution when handling firearms: Always treat firearms with respect and practice proper safety procedures. Never leave a loaded firearm unattended. Store firearms securely in the cabinet when not in use.
  • Conclusion

    Building an in-wall gun cabinet is a great way to keep your firearms safe and secure while blending seamlessly into your home. It takes planning, precision, and a healthy dose of caution, but the end result is a custom-made storage solution that offers peace of mind and security.

    Remember, safety should always be your top priority. Practice responsible gun ownership and store your firearms securely in a well-built and reliable cabinet.

    Share:

    How to build a wooden gun box with a sliding drawer

    How to build a wooden gun box with a sliding drawer

    Building a Wooden Gun Box with a Sliding Drawer

    A wooden gun box with a sliding drawer provides a secure and stylish storage solution for your firearms. This project requires basic woodworking skills and readily available materials. This article will guide you through the construction process step-by-step, ensuring you create a high-quality and functional gun box.

    Materials and Tools

    Before embarking on this project, ensure you have the necessary materials and tools. Gather the following:

    Materials

    • Wood: Choose a sturdy hardwood like oak, maple, or walnut for the box and drawer. You will need approximately 12 board feet of lumber.
    • Plywood: ½ inch plywood for the drawer bottom and back.
    • Wood glue: A high-quality, water-resistant wood glue.
    • Wood screws: 1 ¼ inch and 2 inch screws for assembly.
    • Finishing nails: 1 ½ inch finishing nails for attaching the drawer face.
    • Drawer slides: Heavy-duty, full-extension drawer slides.
    • Wood stain or paint: For finishing the box.
    • Clear polyurethane finish: For protecting the wood.
    • Hardware: A lock, hinges, and a handle for the box.

    Tools

    • Table saw
    • Circular saw
    • Miter saw
    • Drill press or handheld drill
    • Screwdriver
    • Clamps
    • Sandpaper
    • Measuring tape
    • Pencil
    • Level
    • Safety glasses
    • Dust mask
    • Ear protection

    Construction Steps

    1. Cut the Box Pieces

    Begin by cutting the wood for the box. You will need the following pieces:

    • Two side pieces: Cut to the desired length and height of the box.
    • Two end pieces: Cut to the desired width and height of the box.
    • One bottom piece: Cut to the length and width of the box.
    • One top piece: Cut to the length and width of the box. This will be the lid of the box.

    Use a table saw or miter saw for accurate cuts. Ensure all pieces are square and smooth.

    2. Assemble the Box

    Assemble the box using a combination of wood glue and screws. Begin by attaching the side pieces to the end pieces. Apply wood glue to the edges and secure with screws. Repeat for the other side.

    Next, attach the bottom piece to the assembled frame. Use glue and screws to secure it. You may need clamps to hold the pieces together while the glue dries.

    3. Cut and Assemble the Drawer

    Next, create the drawer. Cut the following pieces:

    • Two side pieces: Cut to the desired length and height of the drawer.
    • Two end pieces: Cut to the desired width and height of the drawer.
    • One bottom piece: Cut from the plywood to the length and width of the drawer.
    • One back piece: Cut from the plywood to the length and height of the drawer.

    Assemble the drawer using the same process as the box. Use glue and screws to join the pieces. Allow the glue to dry completely before moving on.

    4. Attach Drawer Slides

    Attach the drawer slides to the sides of the drawer and the interior sides of the box. Follow the manufacturer’s instructions for proper installation. Ensure the slides are level and aligned.

    5. Cut and Attach the Drawer Face

    Cut a piece of wood for the front of the drawer. This piece should be slightly longer than the width of the drawer to create an overhang.

    Attach the drawer face using finishing nails. Use a nail gun or hammer and nail set for a clean and secure finish.

    6. Cut and Attach the Lid

    Cut a piece of wood for the lid of the box. This piece should be slightly larger than the top of the box to create an overhang.

    Attach the lid to the box using hinges. Use a drill and screws to secure the hinges to the lid and box. Ensure the lid opens and closes smoothly.

    7. Sand and Finish the Gun Box

    Sand the entire box, drawer, and lid with progressively finer grits of sandpaper. Start with 80 grit sandpaper and finish with 220 grit. This will create a smooth surface for finishing.

    Apply your chosen wood stain or paint to the box. Allow the finish to dry completely before applying a clear polyurethane finish. Apply several coats of polyurethane for a durable and protective finish.

    8. Install Hardware

    Finally, install the lock, hinges, and handle for the box. Follow the manufacturer’s instructions for installation. Ensure all hardware is securely attached.

    Safety Considerations

    When working with power tools and sharp edges, safety should always be a top priority. Wear safety glasses, a dust mask, and ear protection at all times. Follow the manufacturer’s instructions for all tools and equipment. Be cautious when handling sharp objects and avoid any distractions while working.

    Tips for Building a High-Quality Gun Box

    • Choose high-quality materials: Using durable hardwood for the box and drawer will ensure longevity and durability. Avoid using softwoods that are prone to scratches and dents.
    • Use a quality wood glue: A high-quality wood glue will create a strong bond between the pieces. Choose a water-resistant glue for added durability.
    • Pre-drill holes for screws: Pre-drilling holes before driving screws will prevent splitting the wood.
    • Sand thoroughly: Thorough sanding ensures a smooth and even finish. Use progressively finer grits of sandpaper for a professional look.
    • Apply multiple coats of finish: Applying multiple coats of polyurethane will create a durable and protective finish that will resist scratches and water damage.
    • Use a lock for security: A lock will provide added security for your firearms.

    Conclusion

    Building a wooden gun box with a sliding drawer is a rewarding project that provides you with a customized storage solution for your firearms. By following these detailed steps and safety precautions, you can create a high-quality and functional gun box that will protect your firearms and enhance your home décor.

    Share:

    How to create a wooden gun cabinet with secure and stylish features

    How to create a wooden gun cabinet with secure and stylish features

    Building a Gun Cabinet: Security Meets Style

    Hey there, gun enthusiasts! Whether you're a seasoned collector or just starting out, safeguarding your firearms is a top priority. A good gun cabinet not only keeps your weapons secure but also adds a touch of sophistication to your home. So, let's dive into the world of building a wooden gun cabinet that's both secure and stylish!

    Planning Your Gun Cabinet: The Blueprint

    Before you grab your tools, let's plan this out. The size and style of your gun cabinet should reflect your needs and preferences. Ask yourself these questions:

    1. How Many Firearms?

    Consider the number of guns you own and any future additions. A good rule of thumb is to leave a little extra space for expansion.

    2. Gun Lengths and Types?

    Measure the longest firearm you own to determine the necessary interior height. Factor in room for scopes and other accessories.

    3. What Style Are You Going For?

    Traditional, modern, rustic, or something else entirely? Pick a style that complements your home décor. Look at online resources and magazines for inspiration!

    4. Wood Choice: Oak, Cherry, Walnut?

    Select a wood that aligns with your style and budget. Oak is durable and classic, cherry has a rich red hue, while walnut brings a dark, elegant look. Don't forget to think about how you want to stain or finish your wood.

    The Security Foundation: Locking Mechanisms

    Security is paramount! Here's where your gun cabinet steps up its game.

    1. Solid Construction: More Than Just Pretty

    Start with sturdy, solid wood construction. Avoid using thin, flimsy materials. Thicker wood means more protection and a longer-lasting cabinet.

    2. Locking System: Your First Line of Defense

    This is where you really need to invest. A good locking system is a must-have. Consider these options:

    • Keyed Locks: Reliable and easy to use. Choose high-quality locks with multiple locking points for maximum security.
    • Combination Locks: Eliminate the need for keys. Look for dial-type locks with hardened steel mechanisms for extra resistance against tampering.
    • Electronic Locks: Sleek and modern, these often feature fingerprint scanners or keypad entry. Just make sure they're well-built and use reliable batteries!

    3. Hinges and Hardware: The Silent Guardians

    Don't overlook these details! Choose strong, concealed hinges to prevent prying. Look for durable, heavy-duty hardware like heavy-duty hasps and locking plates.

    Creating a Stylish Cabinet: The Finishing Touches

    Now that you have the security foundation, let's add those stylish elements to make your gun cabinet a true statement piece.

    1. Finish It Right: Stains and Finishes

    Think about what best complements your wood and decor. Here are some popular options:

    • Stains: Add color and depth to your wood. Choose from rich browns, warm reds, or classic blacks.
    • Finishes: Protect your wood and enhance its natural beauty. Consider polyurethane, varnish, or wax to create a durable and elegant finish.

    2. Hardware: The Finishing Touch

    Adding tasteful hardware can elevate the look of your gun cabinet. Consider:

    • Knobs and Handles: Choose styles that complement your cabinet's design. Metal knobs, leather pulls, or even antique-style handles can add a touch of personality.
    • Decorative Molding: Add some visual interest with intricate moldings around the doors, edges, or shelves. Wood carvings can also enhance the design.

    3. Lighting: Showcase Your Collection

    Proper lighting can highlight your collection and make your gun cabinet a focal point. Install:

    • Internal Lights: LED strips or small bulbs can provide a soft glow inside the cabinet.
    • Accent Lighting: Highlight the cabinet with a decorative wall sconce or track lighting above.

    Building Your Gun Cabinet: Let's Get Started

    You've got your plan, so let's bring this to life! Here's a basic framework for building your gun cabinet, but remember: this is just a guide. You'll need to tailor it to your specific design and preferences.

    1. Cutting and Assembly

    1. Cut your wood to size for the cabinet body, shelves, doors, and other components.
    2. Assemble the cabinet frame using glue, screws, and dowels for added strength.
    3. Attach the doors and ensure proper fit and alignment.

    2. Installation

    1. Add shelves, dividers, or any internal components.
    2. Install your locking mechanism with care, ensuring it's secure and functioning smoothly.
    3. Install the hardware: knobs, handles, and hinges.

    3. Finishing Touches

    1. Sand your cabinet thoroughly for a smooth surface.
    2. Apply stain and let it dry completely.
    3. Finish with your chosen protective coating (polyurethane, varnish, or wax), applying multiple coats for durability.

    Safety First: Always Prioritize Security

    It's important to remember: a gun cabinet is meant to protect your firearms and keep them out of unauthorized hands. Never skimp on security measures. Use high-quality locks, and always practice safe gun handling and storage practices.

    Conclusion: A Secure and Stylish Home for Your Guns

    Building a wooden gun cabinet can be a rewarding project. You'll have a custom-designed piece that not only keeps your firearms secure but also adds style and elegance to your home. Remember to prioritize security, be creative with your design, and enjoy the process! You'll have a piece of furniture you can be proud of and know your guns are protected.

    Share:

    How to design a handmade gun cabinet with functional storage

    How to design a handmade gun cabinet with functional storage

    Designing a Functional Handmade Gun Cabinet

    Owning firearms comes with the responsibility of safe and secure storage. A well-designed gun cabinet not only protects your weapons but also enhances the aesthetic appeal of your home. This article will guide you through the process of designing and building a functional handmade gun cabinet, incorporating smart storage solutions for maximum efficiency and security.

    Planning and Design Considerations

    Before embarking on your project, careful planning is essential. Consider the following factors:

    Size and Dimensions

    The cabinet's size should accommodate your firearm collection comfortably. Measure your firearms and accessories to determine the required length, width, and height. Allow adequate space for future additions.

    Material Selection

    Choose a durable material that can withstand the weight and stress of firearm storage. Common options include:

    • Solid Wood: Offers excellent strength, durability, and a classic aesthetic.
    • Plywood: Provides stability and affordability. It can be painted or stained to match your décor.
    • Metal: Durable and fire-resistant, but may require specialized tools and welding expertise.

    Security Features

    Prioritize security to prevent unauthorized access. Consider:

    • Locking Mechanism: Choose a high-quality, tamper-resistant lock with a robust deadbolt.
    • Door Hinges: Opt for concealed, reinforced hinges to deter forced entry.
    • Steel Plate: Incorporate a steel plate around the lock area for added protection against drilling attempts.

    Storage Organization

    A well-organized cabinet ensures efficient storage and easy access. Think about:

    • Shelves: Adjustable shelves allow you to customize the space for various firearm sizes and accessories.
    • Drawers: Offer secure storage for ammunition, cleaning supplies, and other sensitive items.
    • Hangers: Hang firearms on dedicated hangers to prevent scratches and minimize stacking.
    • Cable Locks: Utilize cable locks to secure firearms to the shelves or hangers, adding an extra layer of protection.

    Construction Process

    Once you have your design finalized, follow these steps for construction:

    Framing the Cabinet

    1. Cut and assemble the cabinet's frame using your chosen material. Ensure all joints are secure with glue and screws or dowels.

    2. Consider adding additional reinforcement around the lock area and hinges for enhanced security.

    Building the Shelves and Drawers

    1. Cut and assemble shelves and drawers using the same material as the frame or a different material for contrast.

    2. Install drawer slides and ensure they are properly aligned. Consider using soft-close slides for smooth operation.

    Installing the Door and Locking Mechanism

    1. Hang the door using the pre-installed hinges. Ensure it closes securely and smoothly.

    2. Install the locking mechanism, including the strike plate, using the provided instructions.

    3. Test the lock's functionality and ensure it operates smoothly.

    Finishing Touches

    1. Apply a protective finish, such as paint, stain, or varnish, to the cabinet to enhance its appearance and provide protection against moisture and scratches.

    2. Add decorative elements like molding or trim to create a more customized look.

    Safety and Maintenance

    After construction, ensure your handmade gun cabinet meets safety standards and maintain it properly for optimal performance:

    Fire Safety

    Store the cabinet away from heat sources and install a fire-resistant liner or consider a fireproof safe for added protection.

    Moisture Control

    Prevent moisture buildup by storing the cabinet in a dry environment and maintaining good ventilation. Moisture can damage the wood and affect the firearm's condition.

    Regular Maintenance

    Periodically inspect the cabinet for loose screws, worn-out hinges, or damage to the finish. Lubricate hinges and locks to maintain smooth operation.

    Additional Considerations

    Beyond the essential aspects, consider these additional factors for an even more functional and aesthetically pleasing cabinet:

    • Interior Lighting: Install a small LED light inside the cabinet for easy viewing in low-light conditions.
    • Humidity Control: If you live in a humid environment, consider incorporating a small dehumidifier inside the cabinet to protect your firearms from corrosion.
    • Security Alarm System: Integrate a security alarm system with the cabinet to notify you of any unauthorized access.
    • Customization: Tailor the design to your preferences and match the cabinet's style with your home's interior design.

    Conclusion

    Building a handmade gun cabinet can be a rewarding project, allowing you to create a safe and personalized storage solution for your firearms. By carefully planning, selecting the right materials, and following the construction steps outlined above, you can ensure your cabinet meets your specific needs and enhances the safety and organization of your gun collection.

    Remember to prioritize security, incorporate smart storage features, and prioritize proper maintenance to ensure the longevity and effectiveness of your handmade gun cabinet.

    Share:

    10 woodworking tips for building the perfect magic box

    10 woodworking tips for building the perfect magic box

    Alright, you want to build a magic box, huh? That's awesome! I love the idea of bringing a little bit of wonder and mystery into the world. But before you start sawing and gluing, let's talk about some tips to make sure your magic box is truly special. Think of this as your secret guide to woodworking wizardry!

    1. Choose Your Wood Wisely - The Foundation of Magic

    First things first: the wood. This isn't just about looks, it's about the soul of your box. Imagine what kind of magic you want to conjure. Want something dark and mysterious? Ebony or walnut will do the trick. Something lighter and ethereal? Maple or birch might be your best bet.

    And don't underestimate the power of a good wood finish! A rich, dark stain can add an air of antiquity, while a light, natural oil finish lets the wood's beauty shine through.

    2. Secret Compartments - Where the Magic Hides

    Every magic box needs a secret compartment! Think about the tricks you want to perform and what you need to hide. Do you need a hidden space for a tiny puppet to pop out? Maybe a compartment for a deck of cards to disappear? Or perhaps a secret drawer for a magic wand to appear?

    Now, there are all kinds of ways to create these compartments. You can use false bottoms, hidden panels, even magnetic catches. Get creative and think outside the box! (Pun intended, of course!)

    3. The Power of Hinges - Opening Up the Mystery

    You want hinges that are strong and smooth, so your magic box opens and closes seamlessly. Avoid those cheap, flimsy hinges that can easily break. Instead, look for sturdy hinges made of brass or steel. And don't forget about the finishing touch: add some decorative hinges for that extra bit of whimsy.

    4. A Lock and Key - The Gatekeeper of Secrets

    Now, a magic box isn't truly magical without a lock and key. Think about it: what's more intriguing than a secret you can't easily unlock?

    Again, choose your lock wisely. It should be sturdy enough to keep your secrets safe but simple enough to operate with a flourish. Maybe you even want a lock with a hidden release mechanism, adding another layer of mystery.

    5. The Art of Detail - Adding the Spark of Magic

    A magic box is all about the details. Think about the little things that can make your box truly special. A beautifully carved handle, maybe some intricate inlays, or even a hidden inscription on the inside.

    Remember, every detail adds to the story, so don't be afraid to get creative. Adding a unique touch like a tiny clockwork gear or a glowing gem could make your box truly unforgettable.

    6. A Touch of Illusion - Tricking the Eye

    Here's where you get to play with perspective and trick the eye. Think about how you can use mirrors, hidden lights, or even different materials to create illusions. Maybe you want to make an object appear to float in mid-air, or disappear completely.

    Remember, the more surprising and unexpected your tricks are, the more magical your box will seem.

    7. Don't Forget the Showmanship - It's All in the Presentation

    A magic box is only as magical as the person who uses it. Practice your tricks and learn to perform them with confidence and flair. A theatrical presentation can transform a simple box into a captivating spectacle.

    Remember, your personality and charisma are your secret weapons. Don't be afraid to add your own unique touch to the show.

    8. Inspiration is Everywhere - Look for Magic in the World

    Want some ideas for your magic box? Look around you! The world is full of magic, you just need to know where to look. Look at nature: the intricate patterns on a butterfly's wings, the swirling shapes of a cloud. Look at architecture: the hidden details in a cathedral, the whimsical curves of a carousel.

    All these things can inspire your own unique design.

    9. The Power of Practice - Make Your Magic Flow

    Building a magic box is only the beginning. You need to practice your tricks, refining your movements and timing. The more you practice, the smoother and more believable your magic will become.

    Don't be afraid to experiment, to make mistakes, and to learn from them. That's how you truly master the craft of magic.

    10. Most Importantly - Have Fun!

    Building a magic box is a journey of creativity and wonder. Enjoy the process, embrace the challenges, and let your imagination run wild. Remember, magic is about bringing joy and amazement to others. So have fun, be creative, and share your magic with the world!

    Now, go forth and build your magic box! The world needs more wonder and a little bit of magic, and you're the perfect person to bring it to life. And remember, if you need any more tips, feel free to ask! I'm always happy to help fellow magic makers. ✨

    Share:

    How to build a secure wooden gun case for safety

    How to build a secure wooden gun case for safety

    Alright, so you want to build a gun safe, but you're thinking, "I don't want a big metal monstrosity taking up half my garage." I get it. Sometimes, you just need a smaller, more discreet way to store your firearms. That's where a wooden gun case comes in!

    Now, building a wooden gun case might seem intimidating, but trust me, it's totally doable. You don't need to be a master carpenter, just a little handy with tools and a bit of patience.

    Let's get started, shall we?

    1. The Plan:

    First things first, we need a plan. You gotta figure out what you want to store, how many guns you'll be keeping safe, and the overall dimensions of your case.

    Size: Think about the longest gun you'll be storing and add a few extra inches for padding and wiggle room. You also want to make sure the case is wide enough to accommodate the largest gun you'll be storing.
    Design: You can go super simple with a basic box design or get fancy with compartments and dividers. The key is to make it functional for your needs.
    Materials: The strength of your case depends on the wood you choose. Hardwoods like oak or maple are great options, but they can be pricey. You could go for a less expensive wood like pine or plywood and beef it up with extra layers or thicker boards.

    2. Gathering Your Gear:

    Once you have a solid plan, you'll need the right tools and materials.

    Wood: Choose your wood wisely. The thickness will depend on your gun size and desired security. For a basic case, you might use 1/2" thick boards. If you're going for extra security, consider 3/4" or even 1" thick boards.
    Fasteners: You'll need screws or nails for assembly. Use screws for a stronger hold and countersinking for a clean look.
    Hinges: Choose strong, sturdy hinges for the lid. You might even want to add locking hinges for an extra layer of security.
    Locking Mechanism: You can get creative here. A simple padlock and hasp will work, or you could integrate a more complex locking system.
    Padding: Protect your precious firearms with foam, felt, or even carpet. It adds a layer of cushioning and prevents scratches.
    Tools: Get your essential woodworking tools ready: saw, drill, hammer, sander, measuring tape, pencil, clamps.

    3. Constructing the Case:

    Now it's time to get your hands dirty! Here's the basic construction process:

    Cut the wood: Using your saw, cut your boards to the exact dimensions you've planned. It's best to measure twice and cut once.
    Assemble the sides: Use glue and screws to attach the side panels of the case. Make sure they're square and secure.
    Attach the bottom: Securely attach the bottom panel to the sides, making sure it's flush.
    Build the lid: Create the lid using the same technique as the bottom. Make sure the lid fits snugly on the case.
    Install the hinges: Attach the hinges to the lid and the case body. Make sure they're aligned properly and strong enough to support the weight of the lid.
    Add the locking mechanism: Attach your chosen locking mechanism to the lid and case body.
    Add padding: Once your case is assembled, line the inside with your chosen padding material.

    4. Finishing Touches:

    Time to make your case look fantastic!

    Sanding: Smooth out any rough edges or imperfections with sandpaper.
    Finishing: Choose a finish for your case. You could use a clear stain, paint, or even a natural oil to protect the wood.
    Final touches: Add any decorative elements you like, like brass accents, wood inlays, or custom lettering.

    Security Tips:

    While a wooden gun case is a great way to keep your guns organized and out of sight, it's important to remember that it's not as secure as a metal safe.

    Location, Location, Location: Store your case in a secure location. If you can, bolt it down to the floor.
    Heavy Duty Locks: Go for a high-quality lock that's difficult to pick or bypass.
    Concealment: You can further deter thieves by camouflaging your case in plain sight.
    Layer your security: A wooden case is a great first line of defense, but it's always good to have a backup plan.

    Safety First:

    Always remember, safe storage is crucial.

    Keep it out of reach of children: Lock your case securely and never leave your keys within reach of kids.
    Store unloaded: Always store your firearms unloaded with the safety on.
    Separate ammunition: Keep ammunition stored separately from your guns.

    Building your own wooden gun case is a rewarding project that can give you peace of mind about your firearms. Just remember, safety and security are paramount. Don't just build a case, build a safe haven for your guns!

    Share:

    Popular Posts

    Search This Blog

    Powered by Blogger.

    Recent Posts

    Sample Text


    Pages